
 |
|
|
66 messages • Accèder à une page • 1, 2, 3, 4, 5
|
Modérateurs: Modération Forum Installations, Le Bureau de l’Association HCFR • Utilisateurs parcourant ce forum: Aucun utilisateur enregistré et 1 invité
Forum dédié à la calibration vidéo
Ted's LightSpace CMS Calibration Disk
![]() » 15 Nov 2013 20:04
» 15 Nov 2013 20:04
- realzven
- Messages: 10439
- Inscription Forum: 13 Mar 2010 15:19
-
![]() » 17 Nov 2013 0:03
» 17 Nov 2013 0:03
Quelques photos de mires intéressantes


- realzven
- Messages: 10439
- Inscription Forum: 13 Mar 2010 15:19
-
![]() » 22 Nov 2013 1:41
» 22 Nov 2013 1:41
news
New workflows Only for calman 5 Users (calman Enthusiast or Ultimate licence, version 5.2.0a - build 1374)
pre-calibration tools workflow


New workflows Only for calman 5 Users (calman Enthusiast or Ultimate licence, version 5.2.0a - build 1374)
I have created 2 Workflows to make my disk users experience/calibration time simplier - easier - faster!
Pre-Calibration Tools + Verify Calibration Tools Workflows for CalMAN 5.2a.
pre-calibration tools workflow
- realzven
- Messages: 10439
- Inscription Forum: 13 Mar 2010 15:19
-
![]() » 22 Nov 2013 1:51
» 22 Nov 2013 1:51
verify calibration tools workflow


- realzven
- Messages: 10439
- Inscription Forum: 13 Mar 2010 15:19
-
![]() » 03 Déc 2013 23:53
» 03 Déc 2013 23:53
- realzven
- Messages: 10439
- Inscription Forum: 13 Mar 2010 15:19
-
![]() » 07 Déc 2013 12:40
» 07 Déc 2013 12:40
- realzven
- Messages: 10439
- Inscription Forum: 13 Mar 2010 15:19
-
![]() » 08 Déc 2013 23:26
» 08 Déc 2013 23:26
New calman workflows
ConnecTEDDD a écrit:
Today I have added some new pages for the Ted's LightSpace CMS Calibration Disk CalMAN 5 Workflow Users.
This Meter Profiling Check layout page is useful for users to check if their meter profiling correction table is accurate.
I'm sure you will be surprised when you will find out that your familiar meter profiling procedure you followed since now maybe has create some not valid tables for some reason but you haven't realized that this is be possible because you have always followed the correct way but you haven't checked it.
Use this Reference Meter Page to take WRGB measurements using your Spectro and after that run your meter profiling procedure. (re-measure again the WRGB patches using your spectro and colorimeter)
Later, use the Profiled Meter Page to measure the WRGB Patches with your Profiled Meter to see if the correction table is accurate vs. your reference meter readings.
You will found that sometimes it will need to re-perform your meter profiling 2-3 times to get you accepted results. Count also your meter repeatability/display instability here that maybe produce inaccurate meter correction tables.
Here is a 11-Point Grayscale for users who want to use their internal display multiple-step grayscale RGB Balance Controls in case they have checked before that if these controls are not introducing problems in Grayscale Ramps.
White Balance page can be used to check differencies of meter integration time or sync settings to help you find out your best repeatability/speed meter setting of your current display.
You can use this Color & Tint Page to check your Gamut performance, check what is happening by tweak your Color or Tint settings, help you choose your color space, or manual perform 6-Axis CMS Calibration. There indicators that will help users with HSL or RGB Display Controls of each color.
* Meter Profiling Check Page has been added to Verify Calibration Tools Workflow also.
More Screenshots of CalMAN 5 Workflow Pages that my disk user have access can be found here.
- realzven
- Messages: 10439
- Inscription Forum: 13 Mar 2010 15:19
-
![]() » 14 Déc 2013 11:54
» 14 Déc 2013 11:54
Update : New calman Pre-calibration tools 1.0.3 workflow


News : Next week, the MP4 Media Files Version of the Disk will be available
More news : http://www.displaycalibrations.com
News : Next week, the MP4 Media Files Version of the Disk will be available
More news : http://www.displaycalibrations.com
- realzven
- Messages: 10439
- Inscription Forum: 13 Mar 2010 15:19
-
![]() » 28 Déc 2013 21:56
» 28 Déc 2013 21:56
Bonjour à tous
La version MP4/MKV est disponible, vous allez enfin pouvoir calibrer vos NMT et autres lecteurs MP4/MKV.
Pour 15$US il ne faut pas s'en priver : http://www.displaycalibrations.com/medi ... order.html
Merci à TED !
La version MP4/MKV est disponible, vous allez enfin pouvoir calibrer vos NMT et autres lecteurs MP4/MKV.
Pour 15$US il ne faut pas s'en priver : http://www.displaycalibrations.com/medi ... order.html
Merci à TED !
- alex_t
- Membre HCFR Contributeur

- Messages: 10889
- Inscription Forum: 29 Oct 2005 23:04
- Localisation: Ile-de-France, 77
-
![]() » 28 Déc 2013 21:59
» 28 Déc 2013 21:59
Grillé par Alex 
- realzven
- Messages: 10439
- Inscription Forum: 13 Mar 2010 15:19
-
![]() » 28 Déc 2013 22:48
» 28 Déc 2013 22:48
Quelques info en plus :
Un aperçu :
http://s25.postimg.org/vhn5k4k0d/Preview_01.png
http://s25.postimg.org/t98z2scwd/Preview_02.png
http://s25.postimg.org/sl04jue6l/Preview_03.png
http://s25.postimg.org/6zv1w8hfx/Preview_04.png
=========
The MP4/MKV Media Files Version of the Ted's LightSpace CMS Calibration Disk has just released.
This release contains all the chapters of the Blu-Ray Release in MP4 and MKV formats, to give support to as many devices as possible, like:
Stand-Alone Media Players
PC/MAC Software Players
Satellite Tuners
Digital TV Receivers
Consoles (for movie playback from USB)
Tablets/SmartPhones (who want to verify their screen for fun)
TV's USB Movie Mode
Apple Devices (iPad/iPhone etc.)
Stand-Alone Media Players or PC Media Players that can't playback Blu-Ray ISO Files with Full-Menus (who users who tryed to use the Blu-Ray ISO Version of the disk to these players that don't support Full Blu-Ray Menus from any ISO.)
...And generally all possible devices that can have media player capabilities.
MadVR Users can use the LightSpace Chapter to perform Cube Profilings using LightSpace DIP Mode.
- alex_t
- Membre HCFR Contributeur
- Messages: 10889
- Inscription Forum: 29 Oct 2005 23:04
- Localisation: Ile-de-France, 77
-
![]() » 10 Jan 2014 14:56
» 10 Jan 2014 14:56
UpdaTED CalMAN 5 Workflows (For Ted's Lightspace CMS Calibration Disk Users) for CalMAN 5.2.2.1404 Release.
2 New Pages Added to Pre-Calibration Tools Workflow.
Advanced Color Gamut Page: For simplier gamut manual CMS using internal display 6-Axis CMS Controls . Default: 100% Saturation / 100% Stimulus Level but it can be changed manually from the user to 75% Stimulus Level.
Advanced Color Saturation Page: For simplier saturation manual CMS using internal display 6-Axis CMS Controls. Default: 75% Saturation / 75% Stimulus Level but it can be changed manually from the user to 100% Stimulus Level.
- realzven
- Messages: 10439
- Inscription Forum: 13 Mar 2010 15:19
-
![]() » 01 Fév 2014 9:45
» 01 Fév 2014 9:45
From Ted on avs forum
Hello, I'm sorry but my website is not ready 100% but you will have a complete idea how the disk's Full Automated (for LightSpace) / Semi-Automated (for CalMAN/ChromaPure) works when you will read the following instructions:
Ted's LightSpace CMS Calibration Disk covers the 3 major software that pro/home calibratiors are using: LightSpace - CalMAN - ChromaPure.
For LightSpace the intergration with the Disk is Fully Automated, look how it works:
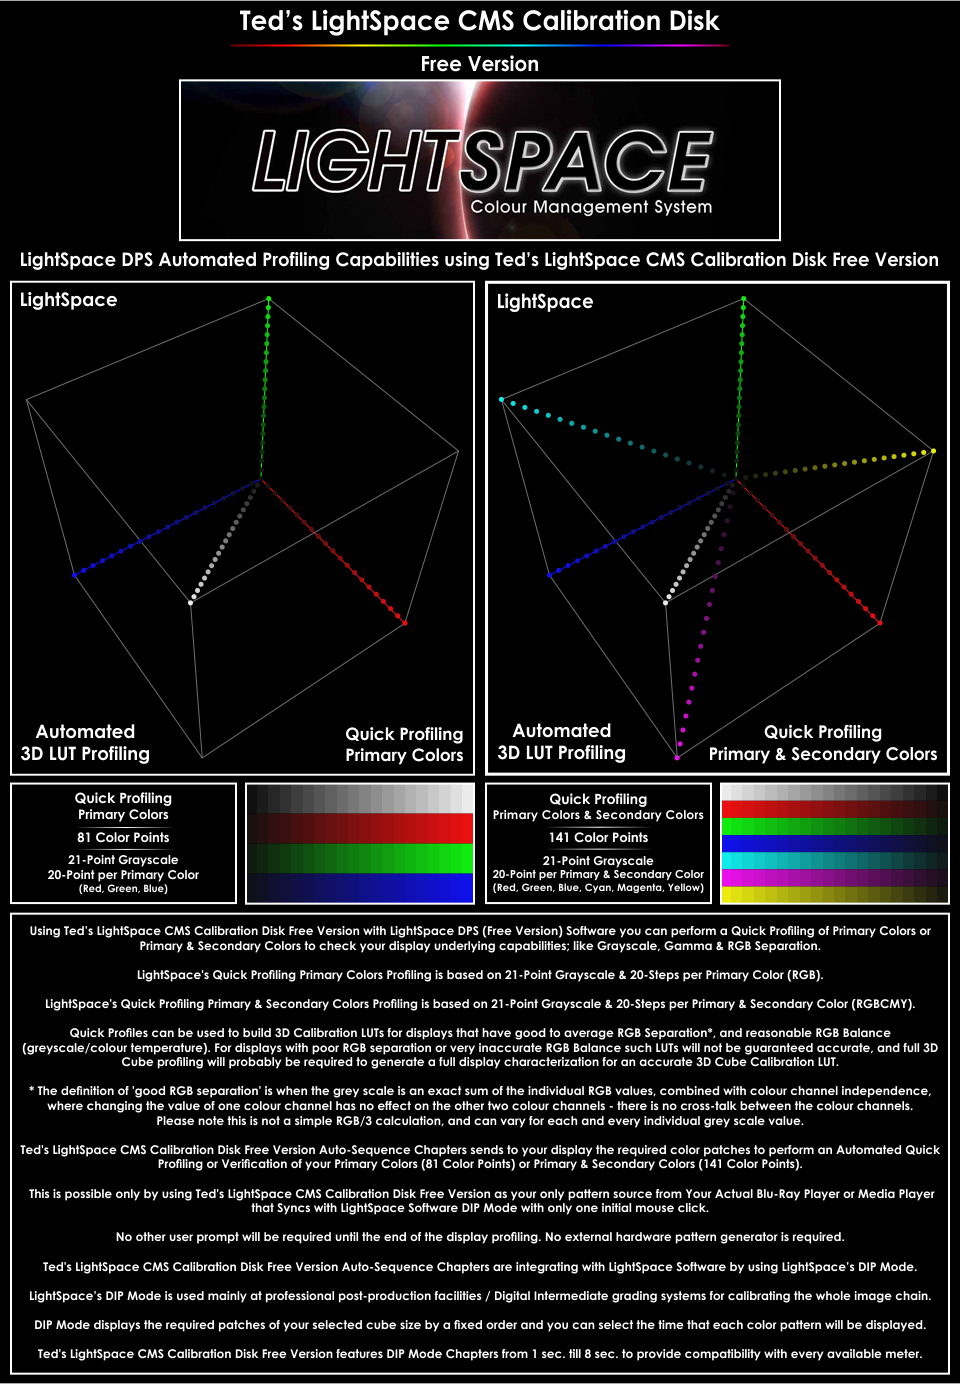
Intergration of Ted’s LightSpace CMS Calibration Disk with LightSpace Software for Automated Quick Profiling /10-Point Cube / 17-Point Cube Profilings without user prompt, How is this possible?
LightSpace is using 2 modes to display and measure the Patches of your SelecTED Cube Size:
Closed Loop Mode: Where the probe dictates the timings per patch, with bright patches measured much faster, darker ones need more time to be measured,
So with Closed Loop Mode you can use the LightSpace Internal Pattern Generator using you Notebook HDMI Output (with proper setup) or to use Lumagen Radiance Series as External Hardware Pattern Generator.
DIP mode (Display Independent Profiling): This mode uses a fixed time of displaying each color patch. Since the LightSpace is using the method of measuring only one time each color point, the patch sequence is fixed for each Cube Size, So My Disk is based to this fixed color point (patch) measuring order...
Example of DIP Mode:
If you select the 5 sec DIP mode, each patch isdisplayed for exact 5 sec before it goes to the next color. LightSpace has a fixed internal delay of 0.5 sec (500ms) which gives command to your meter to read each patch 0.5sec after it’s been displayed via Lumagen or via HDMI Out or via my Disk.
If you want to add some extra delay time before each Patch Measurement, LightSpace has add a Selectable bar you can add any additional time you want, and LightSpace adds your extra time selection to the 0.5sec fixed internal delay.
Example: If you select Extra Delay Time of 0.5sec, then the total delay you will have in total will be 1.0 sec (1000ms) before any meter read.
(This is something I requested from LightIlusion to Add it as a feature @ December 2012, to help Plasma Profilings for more stable measurements)
Plasma displays can benefit from adding an Extra Delay Time before each measurement; it's useful for the panel to have more stable presentation of each pattern. How to Find Out which DIP mode can be used for your display/meter?
To find out which DIP Chapter of my disk isrequiredfor your current display settings / meter settings, you have to use the Meter Time per Patch Finder Chapter of my disk which it displays the darkest colors of the selected LUT resolution and you need to measure these patches to find out which is the correct DIP mode Chapter you will need for your display profiling.
As we know, meters require more time to measure a low luminance color (Dark Patches) and also they can read faster a brighter color patch (With more Luminance). The time it takes for your meter to read the Darkest Color Patches of your selecTED LUT Size is something that you need to take some measurements to find out the max time in xxx ms that will be required.
LightSpace has a feature called Measure & Log.
By Selecting this, you will be prompt to enter a File Name, for Example you can type ''5% Red'' and after clicking ok, the LightSpace will take continuous readingsof the pattern you are displaying, as long time as you want, to stop this , press ‘’Stop Measurement’’...
After doing that, a ‘5% Red.cvs’’ file will be created and you will be able to open it with Excel to see the xyY Readings and the time it took for your meter to read this patch.
(This Measured & Log Mode is something I requested from LightIllusion to Add as a feature @ December 2012, while I was trying to find out a way to use the DIP Mode to by synced with My Disk)
This is an example of the CVS file Data contents:
Here you can see the exact time it took to read the 5% Red of my KURO, with my iD3 (I have selected 1.5sec Intergration time).
This is a good way to find out and set your Meter Intergration Time, by checking the repeatability of any patch, and compare 2-3 different Intergration time settings (1sec. 1.25sec, 1.50sec…etc..) to find out which setting have more stable and repeatable xyY measurements.
IMPORTANT DETAIL: Enabling Average Low Light Measurements IS NOT RECOMMENDED TO BE USED WITH MY DISK! Avoid this Low Average Feature because the meter is reading more that one time the same patch (probably it will take 15-40 sec to return a single xyY number)
After you have decided about your Meter Settings, by selecting the Intergration Time and the Display Type (for colorimeters only), you have to spend a few minutes to take some measurements using my Disk’s Meter Time per Patch Finder Chapter.
Example: By Selecting the 17-Point Cube Time per Patch Finder Chapter, you will see this introduction screen..
Here you are able to see the Pattern Order Sequence.
Before each displayed pattern there a notification screen which displays what pattern it will be displayed… so when you will see that 5% Red Info Screen, click Measure and Log... and enter ‘5% Red’ as a file name, to collect data about any measured color.
You have to do this for all the 5% RGBCMY+Gray+Black Patchs to examine later which is the longest meter read with your Current Display Settings.
It’s very important step to keep the Disk-Software Synced during the whole 17-Point Profiling Time.
After you have completed all the required measurements (you will have saved a similar list of measurement files like this one), you have to open each one *.CVS Data
File to find the longest in xxx.ms time it took from you meter to read it.
For example if your Longest in time read is4200ms,add +500ms to this (because LightSpace adds that 500ms internal delay before each reading)…your total max measuring time will be 4700ms… so you will have to use the 5sec DIP mode for your 17-Point Profiling using my Disk.
If you need to add extra additional time of about 1sec, then you can select that from the probe setup window and later select the 6sec DIP mode 17-Point Profiling. (Because 4200ms+500ms+1000ms will need 5700ms).
Be sure you have disabled any Screen Protection, Auto Stand-by mode or your Blu-Ray Player ‘Screen Saver Mode’ during before any Profiling Run.
How the Sync of Ted’s LightSpace CMS Calibration Disk with LightSpace CMS Software Works without user prompt for 17-Point Cube Profilings (4.913 Color Points) is working?
To sync the Ted's LightSpace CMS Calibration Disk played from your Blu-Ray Player with the software it requires ONLY ONE Synced Click from your Notebook Mouse.
My Disk’s DIP Mode Chapters are Starting with a 5 Sec of Chapter Announcement like this one:
(You can check the total chapter time here or from LightSpace software before starting the profiling measurements.)
...A 5sec 'Old Film Like' Countdown with Start,likethis one:
And when you see the last frame.....
You have to click 'OK' the LightSpace Start Measurements Confirmation Window
Click 'OK' to start the measurements or press ‘Enter Key’ from your keyboard (I prefer this for perfect timing)
For the LightSpace users, all chapters are automated with Ted's LightSpace CMS Calibration Disk.
The video below shows the chapter that Klein K-10Ausers can use since it's their meter is so fast; they can use 1 sec per patch only!.
http://youtu.be/fkZSlNFUp7w"]http://youtu.be/fkZSlNFUp7w
* Change the resolution to 1080p and run it at fullscreen.
With this method id3 users can use DIP Mode Chapter with 4 or 5 or 6 sec per Color Patch to perform a 10-Point Cube Calibration in total time between 1 hour - 1hour 40 minutes max, this is something it depends on user display and meter settings.
The LightSpace has a PercentageBar you are able to see your progress...
There is not any other user prompt till the end, After the last Color Patch is being measured, the LightSpace is saving that sesssion of measurements automatically and the same time you will see that image at your TV screen:
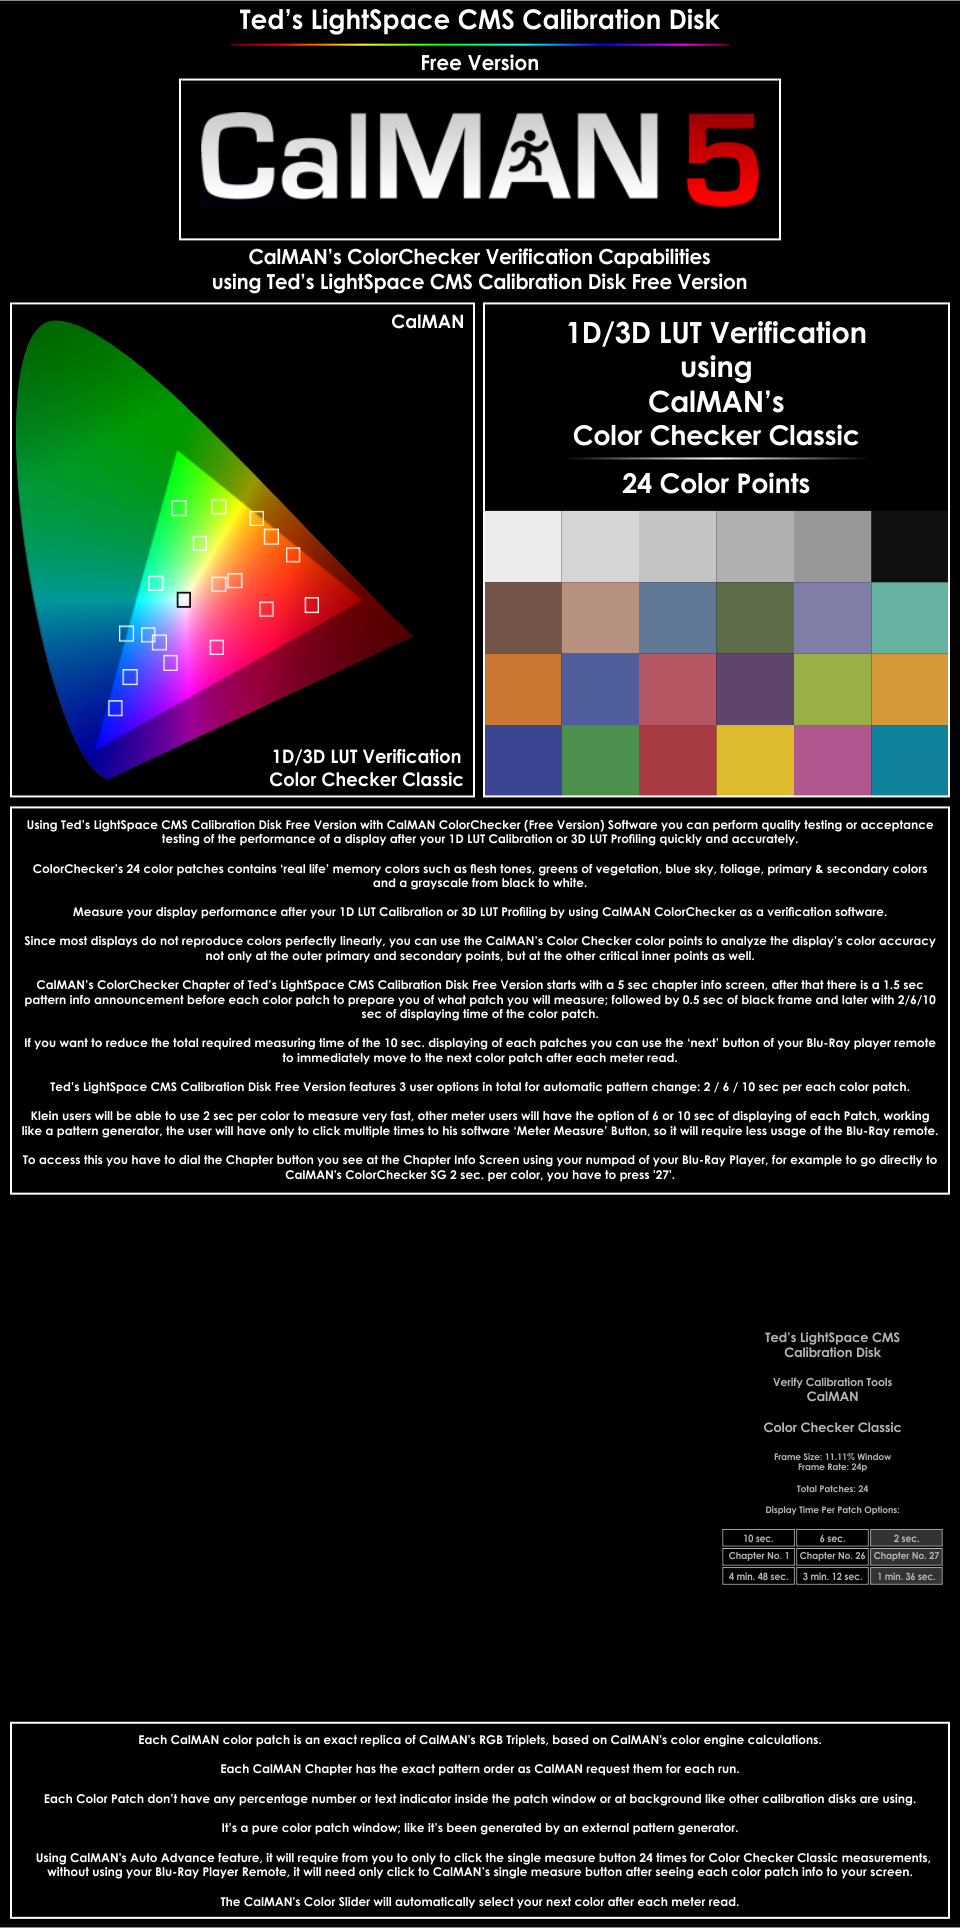
CalMAN use with Ted's LightSpace CMS Calibration Disk
The CalMAN Chapters are created based to the exact same pattern order sequence that CalMAN requests them.
The RGB Triplets of each color patch are exact the same as CalMAN Internal Engine works/expects.
None of my disk patterns has a small lettering indicator of which pattern you are viewing; inside or outside the pattern area. (like other calibration disks)
There is a small 2 sec Pattern Info Screen announcement before any Pattern... I have placed the Pattern Info (for example: 100% Red, 30% Gray etc.) at the right side of the screen and not at the center.....
I did that because at the center of your screen you have placed your meter
After the small pattern announcement, you will see the pure pattern, like it was generated from an External Pattern Generator wink.gif
For example to run a 21-Step Grayscale Set @ CalMAN the Pattern AutoAdvance (Or use the provided workflows I'm hooking up my disk users) and select the 21-Step CalMAN Chapter of the disk.
After that each pattern will be displayed for 10 sec from the disk, you will have to click 21 times the Single Read button of CalMAN. When i was using my id3, it worked very good, I used 1 sec delay also before each meter read.
Unfortunately for C6 (which is extra slow @ low end, it will require to pause the 5-10% patches of the disk, but this has to do with the display you are measuring, for LCD/LED maybe will not required)
I have decide 10sec for each patch because these CalMAN/ChromaPure Chapters are mainly for verification purpose, this means a quick read per color, but if someone needs to perform a 1D LUT Calibration, he can do this by using it's pause button.
No need for IR Controlling, The Chapter for CalMAN or ChromaPure are Auto-Changing every 10 sec. to the next required pattern.
For Example to perform a Color Checker Classic Run you have to press 24 mouse clicks for the meter to read; using my workflow below:
I have uploadTED an example video to show how it works.
Each Chapter starts with 5 sec of Chapter Information Details, and after that there is a 2sec pattern announcement to prepare you of what you will measure and 1 sec of black frame and then 10sec for the color patch, if you like you can use your player remote next button to go faster to the next patch or leave it without user prompt to finish the total pattern displaying.
http://youtu.be/3dOg7HafBBw"]http://youtu.be/3dOg7HafBBw
* Change the resolution to 1080p and run it at fullscreen.
ChromaPure use with Ted's LightSpace CMS Calibration Disk
Same as explained at CalMAN infos above.
Each ChromaPure Chapter starts with a 5 sec of Chapter Information Details, and after that there is a 2 sec pattern info announcement before each color patch to prepare you of what you will measure; after that pattern info announcement there is 1 sec of black frame and then 10 sec for the color patch, if you like you can use your player remote next button to go faster to the next color patch.
RGB Triplets from each Color Patch are coming from the exact RGB Triplets that ChromaPure Color Engine Calculations are based.
Each ChromaPure Chapter has the exact pattern order as ChromaPure request it.
Video Example:
Verify Calibration Tools - ChromaPure: 4-Step Amplitude
https://www.youtube.com/watch?v=fbvty56uTIA
* Change the resolution to 1080p and run it at fullscreen.
You can say that CalMAN / ChromaPure intergration with my disk is Semi-automated, since the user will have only to simply perform some single measurements clicks.

- realzven
- Messages: 10439
- Inscription Forum: 13 Mar 2010 15:19
-
![]() » 07 Fév 2014 19:50
» 07 Fév 2014 19:50
Ted's LightSpace calibration disk MP4 sampler
http://www.avsforum.com/t/1454804/teds- ... t_24323548
http://www.avsforum.com/t/1454804/teds- ... t_24323548
Ted's LightSpace CMS Calibration Disk - MP4/MKV Media Files Version Sampler
Users they are sking me if the Media Files Version of my Disk is compatible with their players, so I'm uploading here for all a Test Chapter in both formats for those who need to check.
I have include 2 versions of MP4/MKV Files for each CalMAN/ChromaPure or LightSpace Meter Setup Chapters.
One version of the files has 1 File per Chapter and it's encoded with included Chapter Marks informations, if your device is supporting Chapter Marks for MP4/MKV Files then you will be able to change the Chapters using your player remote control left-right buttons, but it has to do with the device you are using, if it supports chapters on MP4 or MKV files or if it handles them as a single file without Chapters.
These files are located in CalMAN/ChromaPure or LightSpace Meter Setup Folders.
The other version of that files are located in subfolders of these directories and it's the splited version of color patches at separate files.
For example, inside the 11-Step Grayscale file folder you will find 11 files; each file per color patch (named as 01. 0% Black , 02. 10% Grey, 03. 20% Gray etc.) and your media player will auto advanced to the next color patch since these files are located in the same folder, but you will able to navigate thou the previous/next pattern using your player remote next-previous buttons.
The loading delay time between each file is expected to be at ~0.1-0.5s range because the file format stays the same.
- realzven
- Messages: 10439
- Inscription Forum: 13 Mar 2010 15:19
-
![]() » 02 Juin 2014 17:16
» 02 Juin 2014 17:16
Bonjour,
Ted vient de réaliser une version gratuite de son disque de calibration qui s'intègre aux versions gratuites de Light Space DPS et Calman Colorchecker.
Ci-dessous la news que j'ai reçu via sa news letter :
Ted vient de réaliser une version gratuite de son disque de calibration qui s'intègre aux versions gratuites de Light Space DPS et Calman Colorchecker.
Ci-dessous la news que j'ai reçu via sa news letter :
Today I'm releasing a Free Version of my calibration disk.
Ted's LightSpace CMS Calibration Disk Free Version is a Lite Version of the Full Disk that works with the following public available free calibration software solutions:
Light Illusion's LightSpace DPS & SpectraCAL's CalMAN ColorChecker.
The Free Version Download Link is including both format versions, Blu-Ray ISO and Media Files Version (MP4+MKV); This gives a wide device playback compatibility
Ted's LightSpace CMS Calibration Disk Free Version Download Instructions:
Request a Free Download Link from here.
Required Free Calibration Software Downloads:
LightSpace DPS (Display Profiling System) Free Version Download Instructions:
1) Download LightSpace CMS Demo from here.
2) Request a Free DPS Licence from here.
CalMAN ColorChecker (Free Version) Download Instructions:
Register to receive a free CalMAN ColorChecker license key by filling out the download form here.
- alex_t
- Membre HCFR Contributeur
- Messages: 10889
- Inscription Forum: 29 Oct 2005 23:04
- Localisation: Ile-de-France, 77
-
|
66 messages
• Page 4 sur 5 • 1, 2, 3, 4, 5
Retourner vers Calibration Vidéo |
- Index du forum › Installations › Calibration Vidéo › Ted's LightSpace CMS Calibration Disk
- Mes Favoris •
- L’équipe du forum • Supprimer les cookies du forum • Heure de Paris [CET]
